5 Setting up your computer
5.1 Git and GitHub access
Hypermynds uses GitHub with SSH authentication. Password-based access is not allowed.
5.2 Security and privacy configuration
To mantain an high standard of security for personal laptop all the employees must follow these guidelines:
MacOS 13 Ventura
-
Computers must use hard drive encryption:
- choose Apple menu () then System Settings… and click Privacy & Security;
- scroll until the the FileVault section;
- click Turn On FileVault;
- choose to create a local recovery key and communicate the recovery key to your manager (do not use instant messaging or mail message);
- store the recovery key in the Hypermynds Bitwarden vault.
-
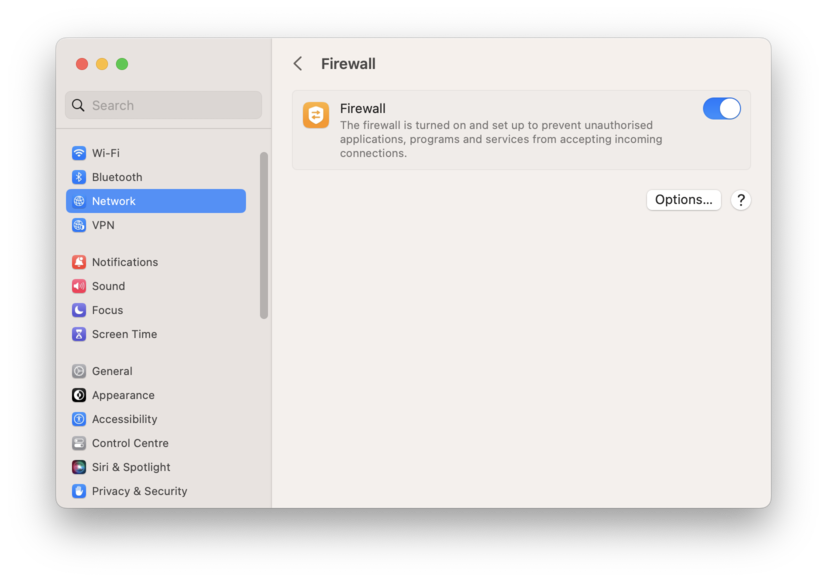
Firewall must be enabled:
- choose Apple menu () then System Settings… and click Network;
- click the Firewall menu;
- click on the toggle to turn on the firewall.
-
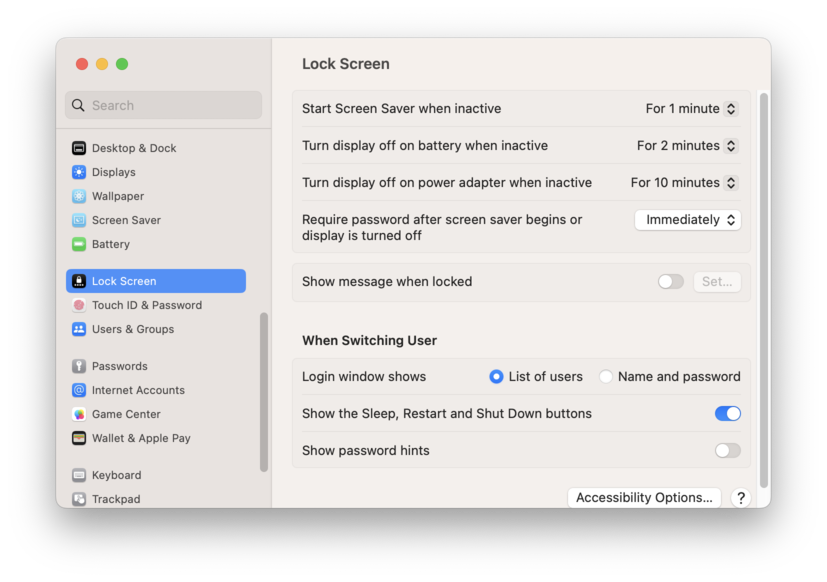
Disable automatic login and require the password when waking from sleep (if FileVault is activated then automatic login is already disabled):
- choose Apple menu () then System Settings… and click Lock Screen;
- select the option to require password immediately after screen saver begins or display is turned off.
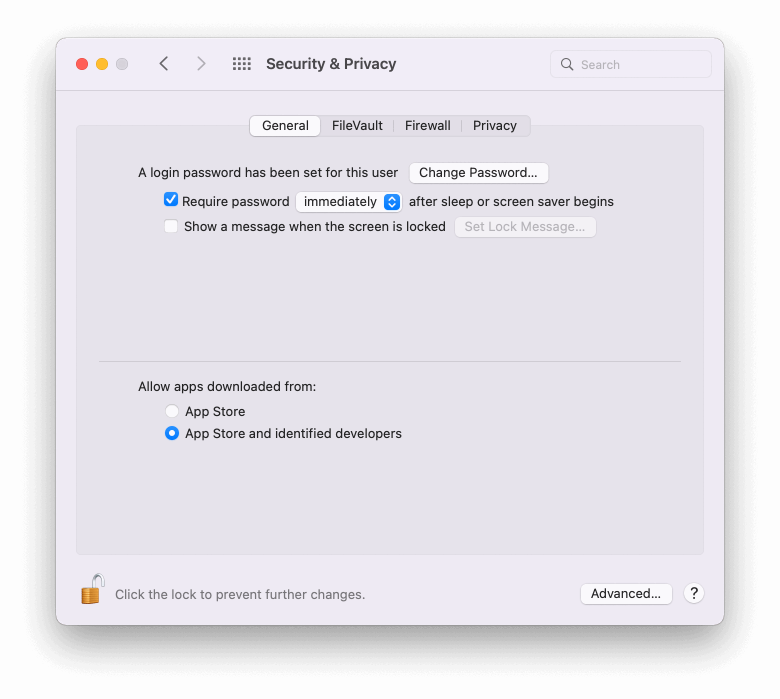
MacOS 12 Monterey
-
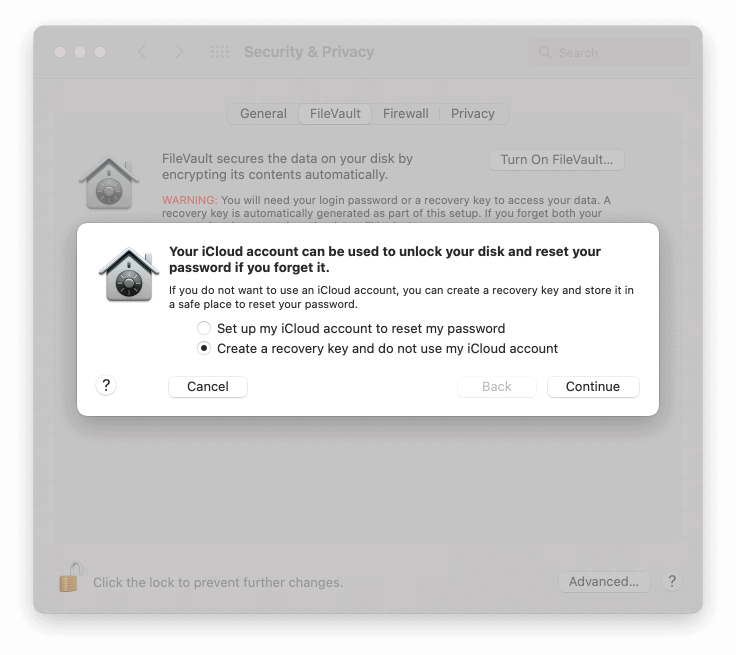
Computers must use hard drive encryption:
- choose Apple menu () then System Preferences and click Security & Privacy;
- click the FileVault tab;
- click Turn On FileVault;
- choose to create a local recovery key and communicate the recovery key to your manager (do not use instant messaging or mail message);
- store the recovery key in the Hypermynds Bitwarden vault.
-
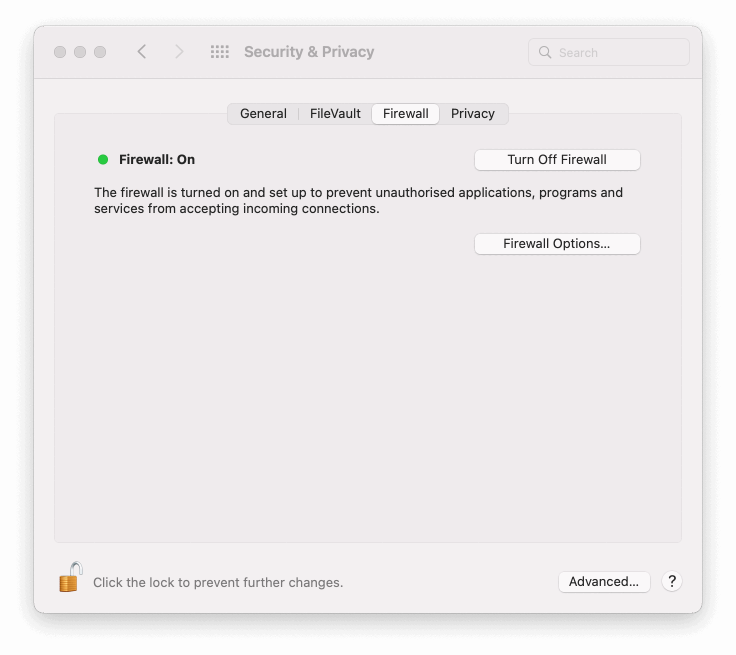
Firewall must be enabled:
- choose Apple menu () then System Preferences and click Security & Privacy;
- click the Firewall tab;
- click Turn On Firewall button.
-
Disable automatic login and require the password when waking from sleep (if FileVault is activated then automatic login is already disabled):
- choose Apple menu () then System Preferences and click Security & Privacy;
- click the General tab;
- select the option to require password immediately after sleep or screen saver begin.
5.3 Password manager
Hypermynds uses Bitwarden as the standard password manager.
All passwords, API tokens, certificates, recovery keys and secrets must be stored in Bitwarden.
Storing credentials in browsers, notes, files, Slack or email is not allowed.
Install Bitwarden from Homebrew:
5.4 How to install the software using Homebrew
Homebrew is the easiest way to install the software and keep it updated. To install Homebrew execute the following command in the Terminal and follow the instructions:
Once that Homebrew has been installed close the Terminal and open it again, you
can check if everything is ok executing the command brew --version, you will
see something like this:
> brew --version
Homebrew 3.3.9
Homebrew/homebrew-core (git revision 8600fa3966f; last commit 2021-12-21)
Homebrew/homebrew-cask (git revision 17172f9d63; last commit 2021-12-21)
To complete the Homebrew setup you should install also
brew-cask-update executing
the command:
5.4.1 Keep everything updated
Homebrew handles the updates of installed softwares by itself, you don’t need to download or reinstall the software checking if a new version of some package has been released. To keep everything updated you should follow the steps:
- command
brew updatedownload the updated list of the packages provided by Homebrew; - command
brew outdatedgives you the list of outdated packages, so you can check if something will break your work; - command
brew upgradeupdates all the outdated packages installing the new available versions; - command
brew cuupdates all the cask packages (usually ignored by theupgradecommand).
5.4.2 Essential commands
brew doctor-
Check your system for potential problems.
brew info <package>-
Show summary of information about a package.
brew install [--cask] <package>-
Install a package or cask.
brew list-
List all installed packages and casks.
brew outdated-
List installed casks and packages that have an updated version available.
brew reinstall [--cask] <package>-
Uninstall and then reinstall a package or cask.
brew search <text>-
Perform a substring search of cask and package names.
brew uninstall <package>-
Uninstall a package or cask.
brew update-
Fetch the newest version of Homebrew and all packages.
brew upgrade [<package>]-
Upgrade outdated casks and outdated packages. If cask or package are specified, upgrade only the given cask or package.
5.5 Setting up the R development environment
R and RStudio can be installed using Homebrew:
> brew install --cask r
...
> brew install --cask rstudio
...
RStudio is installed in your /Applications directory, to check if everything
has been setup correctly it is enough to open it.
5.6 GitHub Personal Access Token (for R and automation)
To interact with private repositories or avoid the GitHub rate limits for unauthenticated users you have to create a GitHub Personal Access Token.
5.6.1 Create the token
Open R or RStudio and execute the following commands:
install.packages('usethis')
usethis::create_github_token()
R will open your browser and redirect it to the page for creating the token (probably it prompt for your password), set the name of the token to “R” and the expiration time to 12 months (tokens without expiration are unsecure), leave everything else untouched and click the button “Create token” at the and of the page.
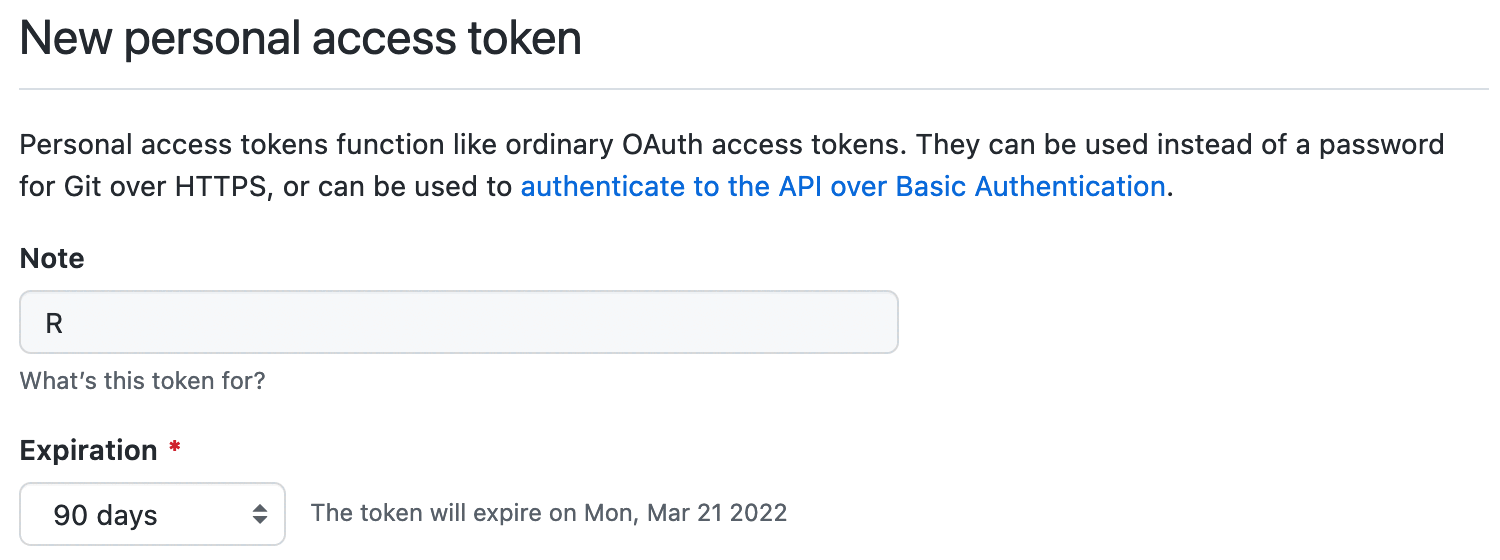
GitHub will show you the new created token (the ugly string with green background), copy it and close the page.

5.6.2 Store the token
Execute the following R command:
usethis::edit_r_environ()Now the file ~/.Renviron will be opened with your preferred editor, now you
can add (or update) the line:
GITHUB_PAT=ghp_xxxxxxxxxxxxxxxxxxxxxxxxxxxxxFor security reasons it is a good idea to change the permissions of
~/.Renviron executing the following command in the Terminal:
5.7 Slack
Slack is the communication platform we use @Hypermynds to chat, interact, manage projects and share thoughts about work and life.
To install Slack on your laptop you can use Homebrew:
> brew install --cask slackThen you can access using your work email that you should have received from your manager.
Never share passwords, tokens, certificates or private keys on Slack, even in private messages.
Slack is not a secure secrets store.
5.8 Mail signature
Apple Mail allows you to create a custom HTML signature for your emails. Follow the steps below to add a personalized HTML signature using the information from the HubSpot Email Signature Generator.
5.8.1 Generate your HTML signature
Copy and paste in blank text file the HTML below, substituting the templates with your own information.
<div style="font-family: Helvetica; font-size: 12px; color: rgb(0, 0, 0);">
  <div style='background: url("https://hm-app-logos.s3.eu-central-1.amazonaws.com/HM_pittogramma_turchese.png") no-repeat; background-size: 45px; padding: 0px 0px 50px 0px;'></div>
  <div style="font-size: 14px; font-weight: 600; color: #080F32;">
    {Name} {Surname}
  </div>
  <div style="color: #00869C; margin-bottom: 15px; text-transform: uppercase; font-size: 10px; letter-spacing: .05rem;">
    {Role}
  </div>
  <div style="font-weight: 600; color: #080f32">Hypermynds Srl</div>
  <div>Via Sempione, 11 | 20900 Monza | Italy</div>
  <div><a href="mailto:{email}">{email}</a> | {mobile} | <a href="http://hypermynds.com">hypermynds.com</a></div>
</div>
Your own role is displayed on Hypermynds Directory.
5.8.2 Create a new signature on Apple Mail
- In the Preferences window of Apple Mail, click on the Signatures tab.
- On the left side, you’ll see a list of your email accounts. Select the account for which you want to add the HTML signature.
- Click on the + button below the middle column to create a new signature. Enter a name for your signature (e.g., “HM”).
- Add placeholder text to your signature. This text will be replaced by your HTML signature, so don’t worry about the content.
- Next, close the Settings window, and quit Apple Mail. It’s important to completely close Apple Mail. When you quit, your signature will be saved in your system. This is a placeholder until you implement the HTML signature by following the steps below.
5.8.3 Paste your HTML signature
- To install your HTML email signature, select Go > Go to Folder in the Finder menu bar.
- In the window, type
~/Library/Mailand click the Go button. - In the new window that appears, click on the folder with the highest number following the letter V. This folder holds the latest version (probably V10).
- Choose MailData folder.
- Choose Signatures.
- In the Signatures folder, you’ll see a list of signature files. Look for the
file you just edited by examining the Modified date and open the newest file
that ends with
.mailsignature. - Select the entire content of your pre-made HTML signature and copy the data.
Select the content starting with the
<body>tag in your.mailsignaturefile and replace it with your pre-made HTML data. Do not delete the data above<body>. Save and close. - Right-click on the mail signature you just edited and choose Get Info.
- Check the checkbox labeled Locked to prevent Apple Mail from overriding your new HTML signature. Important: Do not omit this step, otherwise Apple Mail will override your signature.